The infamous Angels Landing hike in Utah is an epic and scary trail that draws many thousands of hikers every year to the Zion National Park.
This is a hard hike that takes you up the side of a steep sandstone mountain, with chains to grab onto for safety, and amazing views of Zion surrounding you on all sides.
The chain section of Angels Landing is noted for being especially hair-raising and hazardous, and there have been a number of falling deaths on this hike over the years, although it’s plenty safe if you’re careful.
Permits are required since 2022, and you can apply for them via a lottery system conducted by the National Park Service, or else you can book a guided hike that includes permits.
I wouldn’t say this trail is for everyone, but if you enjoy adventure, photography, and a good adrenaline rush, then definitely add it to your bucket list!
This travel guide for Angels Landing will explain how to get permits, where to find the trailhead, how to do the hike safely, and everything else you need to know before you go!

Angels Landing in Zion National Park
Quick Stats
- Distance: 4.5 miles (7.2 km) round trip
- Elevation Gain: 1,500 feet (460 m)
- Top Elevation: 5,790 feet (1,765 m)
- Duration: 3 – 6 hours
- Difficulty: Hard

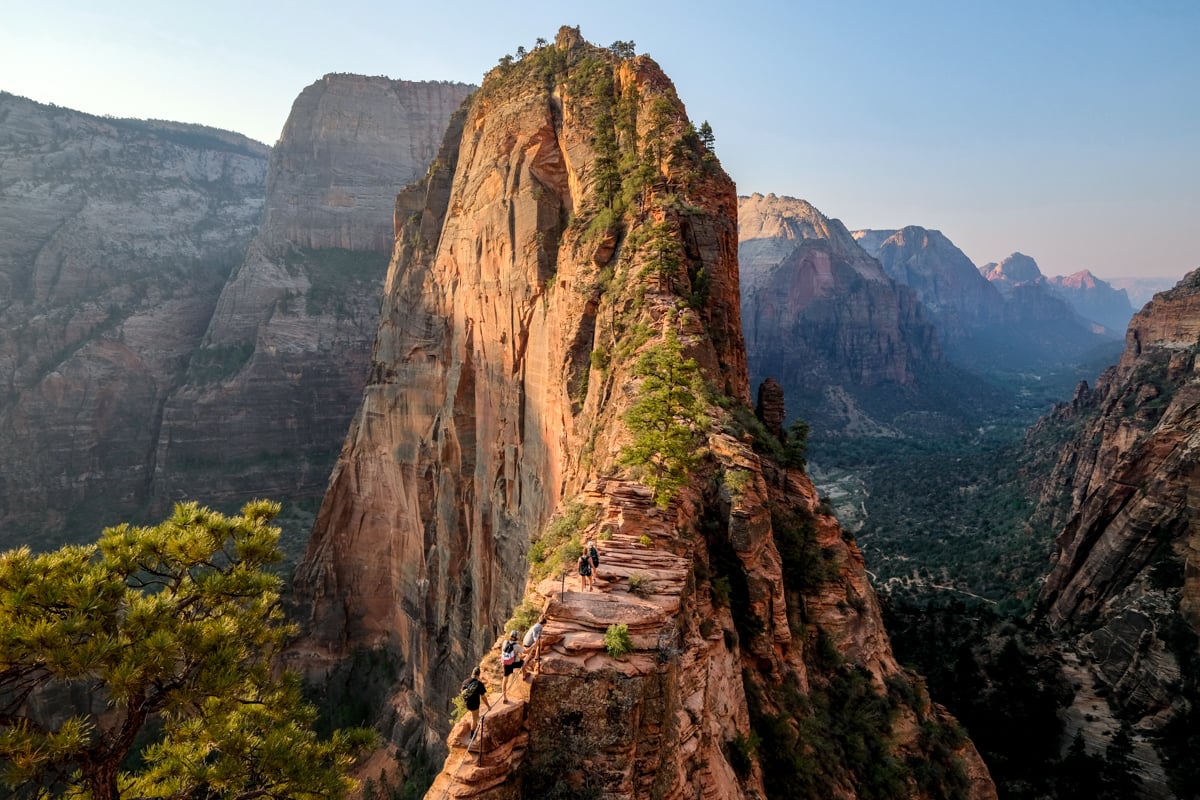
Part of the infamous chain section
Angels Landing Hike: What To Expect
Angels Landing is a scenic trail that takes you out of a canyon and up a steep mountain ridge, where you have to hold onto metal chains for safety.
This is an extremely popular trail, and Zion National Park is a very busy place in general, but the crowds are a lot more manageable now that permits are required to do the hike.
It’s a safe enough hike if you’re careful, but I wouldn’t recommend it for young kids, unfit older folks, or anyone who is not surefooted and comfortable with heights. People have died on the chain section of Angels Landing.
The details below will explain each part of the trail and what to expect. This entire hike is so worth it!

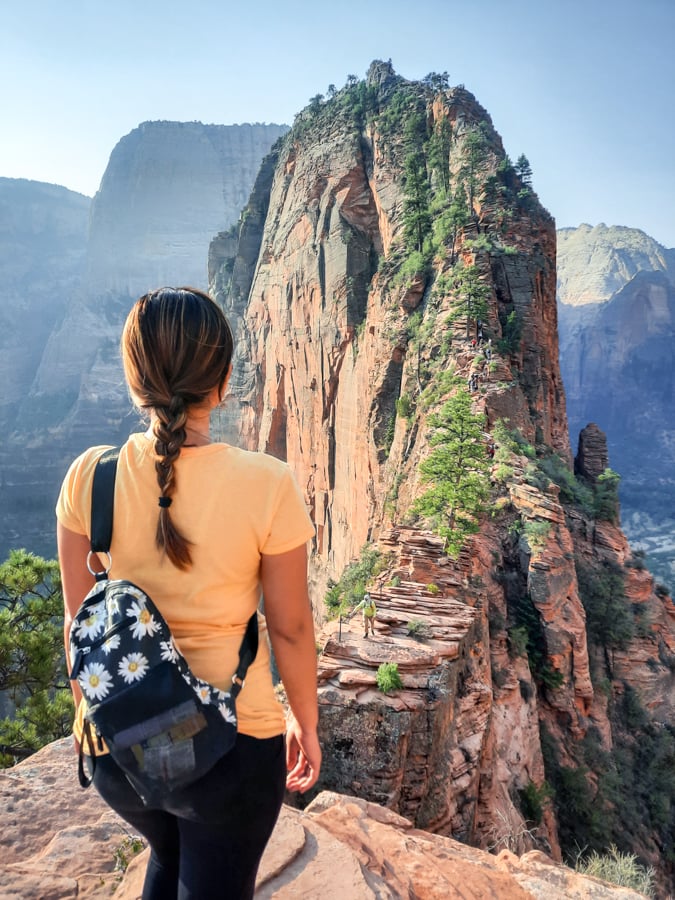
The final view at Angels Landing is an epic 360 degree panorama of cliffs and canyons
• First Switchbacks
The Angels Landing hike starts out on a flat, paved path at the trailhead, but quickly starts to gain elevation right after you cross the bridge over the Virgin River.
You’ll spend the next mile on these switchbacks. There’s no shade at all to protect you from the sun, but the path is wide and the canyon views are already amazing.
At this point, you can already see the massive peak of Angels Landing towering in front of you. Yikes! As you keep climbing these switchbacks, your views of the Zion canyon only get better by the minute.

The steep peak of Angels Landing as seen from below

Some of the first switchbacks you’ll encounter

Zion canyon views on the Angel’s Landing trail
• Refrigerator Canyon
After trudging up a mile of very exhausting switchbacks, you’ll arrive at Refrigerator Canyon, which gets its name from the nice, cool temperatures in the shade.
The path flattens out a bit, and it’s a great chance to catch your breath after the initial switchbacks. We even found a neat little cave with just enough room for a person.
Refrigerator Canyon is one of the only places in the entire hike where you get any shade, so enjoy it while it lasts.

Shady section

Mini cave

Near the top of Refrigerator Canyon
• Walter’s Wiggles
Next up: it’s time for more switchbacks!
This section is called Walter’s Wiggles, and it has some very relentless switchbacks that will tax your legs big time.
There are 21 switchbacks in total, and you gain about 250 feet of elevation in this short section alone.

Walter’s Wiggles

Looking back down at Walter’s Wiggles
• Scout Lookout
Near the 2 mile mark, after completing Walter’s Wiggles, you’ll arrive at Scout Lookout.
It’s a spacious viewpoint where you can look out over Angels Landing and the canyon below, without actually navigating any steep cliffs or holding onto chains (yet).
I wouldn’t recommend going past this point with young kids, unfit older folks, or anyone who’s not surefooted and comfortable with heights. Since 2022, permits are now required to go past Scout Lookout. This is the farthest you can go without a permit.
Scout Lookout has plenty of room for hikers to sit and relax, and even a few restrooms on the hillside, although they are unmaintained and utterly nasty.
This is the last non-exposed part of the hike, and you’ll start to see warning signs telling you so. Catch your breath here, because things are about to get dicey!

Warning sign at Scout Lookout. This is the last non-exposed part of the Angel’s Landing hike.

Start of the chain section
Such a great hike

Here’s where things get sketchy! However, the chains are metal and sturdy.
• Angels Landing Chain Section
Now begins the real fun: the chain section of Angels Landing!
This is the most thrilling and dangerous part of the hike, and it’s what brings many people to Angels Landing in the first place.
At times, the trail will only be a few feet wide, and you’ll have to hug the side of the mountain. Not all of this section has chains, but the most sketchy parts do for your safety.
The chains are metal and sturdy, so you can rely on them. They were first added to this trail decades ago when Zion National Park was still young, but they’ve been maintained and improved many times over the years, so everything is in good shape.
Even though the chain section is only about 1/2 mile long (or less), it feels quite a bit longer because you have to take your time and move slowly.
For safety sake, always make sure you have at least one hand on the chain. This is especially important when you’re passing other hikers going the opposite direction, because you’ll be tempted to let go of the chain to get around them.
You don’t want a passing hiker to trip you, bump you, or fall into you when you’re not holding the chain. That could be lethal. No matter what happens, always put safety first.


Looking back at the end of the chain section
• Summit Of Angels Landing
At long last, you’ll reach the end of the chain section and the top of Angels Landing. Congratulations!
Even though you’re past the chain section and there’s more room to move around, you still need to watch your step and not get overconfident.
People have fallen from the top of Angels Landing when they tried to sneak out to the edge for pictures, not realizing how slippery the sandstone can be. In fact, according to the National Park Service, most falling deaths on this hike have actually been from the top, not the chain section.
The true summit (and best views) are at the end of the mountain, so keep walking a bit further along the top until it dead ends. At the end of the summit, some brave little chipmunks will keep you company and try to steal your snacks.
The final view at Angels Landing gives you a 360 degree panorama of Zion canyon, along with the tiny roads and shuttle buses below, and you can even look down at the gigantic peak you just climbed.
It’s easily one of the best views in Zion National Park, but it’s also one of my favorite views on any hike we’ve ever done.
As always, please remember to keep the trail clean, be considerate of other hikers, and leave no trace. Thanks!

One of my favorite views on Angels Landing. From here, you’re looking directly at Observation Point, another popular trail in the park.

Hikers resting at the top of the summit.

The final view above Zion canyon
How Long Is The Hike?
The Angels Landing hike can take anywhere from 3 to 6 hours roundtrip, depending on your pace and fitness level. I would say 4 hours is a normal time.
Bad crowds can slow you down more, especially on the chain section, although that’s much less of an issue now that permits are required (more on that later).
How Safe Is It?
Angels Landing is plenty safe if you take it seriously. More than 300,000 people successfully completed the hike in 2019. I’ve done it twice myself, and I’d happily do it again.
With that said, I wouldn’t recommend it for young kids, unfit older folks, or anyone who’s not surefooted and comfortable with heights. People have fallen and died here.
I also wouldn’t attempt Angels Landing when it’s very windy, rainy, snowy, or icy. You want decent weather for this one so the rocks aren’t slippery.
If you’re still feeling unsure about this hike, you could do Observation Point instead. It’s another hike in Zion with stellar views of the whole park, and it doesn’t have any of the safety risks or permit hassles of this hike.
Alternatively, you can book a guided hike of Angels Landing with a tour company, and they’ll help you navigate the whole trail safely. They even give you micro spikes if you want them for better traction, although most people will probably be fine without them.

The craziest view at Angels Landing
Deaths On The Angels Landing Hike
At least 17 confirmed deaths have happened on the Angels Landing hike to date, and some sources put that figure closer to 20 deaths. Most of these were falls from steep cliffs.
I definitely wouldn’t discourage you from doing this hike if you’re able. I’m only sharing this information to motivate you to be as safe as possible, and also so you can make an informed decision about whether it’s the right hike for you.
Don’t get me wrong, Angel’s Landing is a very scenic and amazing hike, and it’s one of my all time favorites. It’s not as bad as some people make it out to be, and reaching the top is a fun achievement, but don’t forget to put safety first.
Since permits are required for the Angel’s Landing trail since 2022, that has reduced the crowds quite a bit and the overall safety of this hike is better than ever.
More info: Deaths On Angels Landing

Permits are now required for the Angels Landing hike. I’ll talk about that in a minute.
What To Bring For The Hike
- Shoes. This trail is not sandal friendly at all. You want hiking shoes with good grip.
- Water. Try to pack at least 3 liters per person. In Utah, you should always bring more water than you think you need.
- Snacks. We brought some granola bars and other snacks, and shared them at the top of the mountain.
- Sunscreen. Most of the hike has no shade at all to protect you from the sun, which also happens to be very strong here in southern Utah. You’ll definitely want sunscreen and a hat.
- Gloves. This one is optional. Some people say gloves are helpful for the chain section, but I’m not sure it really makes much difference. We didn’t find the chains to be abrasive or slippery in our hands at all, even without gloves.
- Phone. On most of the trail you won’t get any cell phone reception or texts, but at the top summit we did. This could be handy if you have any important messages to send or receive. And of course, pictures on the hike are a must.


When To Hike Angel’s Landing
The best time of year to hike Angels Landing is in the spring, summer, or fall. Even winter can be good as long as there isn’t snow or ice making the trail hazardous.
Summer is the hottest and also the busiest time to hike Angels Landing, but it’s not too bad if you go early in the morning. Otherwise, the shoulder seasons (spring or fall) are really ideal because they have the best weather and they’re not quite as busy.
Either way, the best time of day to do this hike is very early in the morning, to beat the heat and crowds. Try to get the very first shuttle of the day, if possible.
This means waking up very, very early, but it’s the best way to go if you want to avoid long lines for the shuttle, traffic jams at the chain section, and potentially brutal temperatures.

Where Is Angels Landing?
Angel’s Landing is part of the Zion National Park, in southwest Utah.
Zion is located in the far corner of Utah state, so it’s also within easy driving distance of Page, Arizona or Las Vegas, Nevada.
The park is about 2.5 hours of driving from Las Vegas, or 4.5 hours from Salt Lake City.


Map Of The Trail
Here’s a map from AllTrails that shows the hiking route and elevation profile.
If you sign up for AllTrails Plus, you can download the map and use it offline while hiking. It’s very handy!
Trailhead For Angels Landing: How To Get There
The trail head for Angels Landing is limited to shuttle access only for most of the year, and they only open it to cars during some winter months.
The Zion shuttle is free and easy to use. Just park your vehicle at the Zion National Park Visitor Center (map and GPS location here) and then take the shuttle to stop 6, also known as The Grotto.
The shuttles start early in the morning and go every 5-10 minutes. You can read more about the Zion shuttle schedule at the official website here.
Once you arrive at the shuttle stop 6, just walk across the road and you’ll find a sign marking the Angels Landing trail head (GPS here). Cross the bridge and the hike begins.

Angels Landing trail head sign at Zion National Park
Is Angels Landing Open / Closed?
The Angel’s Landing hike is open all year long, except for trail maintenance or the occasional storm.
You can check about any current trail closures at the Zion National Park website.
Entrance Fee
You’ll need a park pass to enter Zion National Park, but it’s pretty easy to get and you can buy it online or in person.
We normally get the annual pass and visit several U.S. parks in a year, but they also have daily passes. More information and current fees can be found on the Zion National Park website.

Angels Landing Lottery Permit System
Since 2022, the National Park Service now requires day use permits (via lottery) for the Angels Landing chain section. This is a new pilot permit system.
The reason for this change was because the trail was becoming very crowded, and oftentimes you’d be passing other hikers going the opposite direction, which was annoying and made it less safe for everyone.
Before the change, Angels Landing was averaging more than 1,200 hikers per day during the busy season, and during the Covid years those numbers surged even higher. Now that permits are required, the trail has less than half as many hikers as before.
I have mixed feelings about the change. While it’s true Angels Landing was a crowded hike and some changes were needed, I don’t know if a lottery is the best way to do it.
This is one of the main bucket list hikes that brings people to Zion, and for many people it’s not convenient to plan their schedule around a lottery.
In any case, it’s still an amazing hike, and I’ll explain how to get permits in the following section.

First views of the sandstone ‘spine’
How To Get Permits
There are currently two main ways to get permits for the Angels Landing hike: there’s a seasonal lottery you can enter well before your trip, and there are also some permits handed out on a day-before lottery for people who weren’t able to get a permit ahead of time.
According to the National Park Service website, permits are only needed for the Angels Landing chain section. In other words, you can hike all the way up to Scout Lookout without getting a permit, which is handy if not everyone in your group is able to get a permit.
At the moment, it costs $6 USD to apply for permits (which allows you to enter up to 6 people at a time), and then if you successfully receive a permit you’ll have to pay another $3 per person. The fees are non-refundable.
Logically, you have the best chance of getting permits if you apply for a less busy day, month, and/or time slot, when there aren’t as many people hiking in Zion. For example, if you apply to hike at noon on a weekday in March or October (that’s just an example).
The system seems a bit overcomplicated right now since it’s still brand new, but hopefully they’ll iron out some of the kinks over time. You can find more info and apply for permits on the official National Park Service page!
Apply Now: Angels Landing Permits
Can You Hike It Without A Permit?
All of this begs the inevitable question: can you hike Angels Landing without a permit? What do you do if you aren’t able to win a permit in the lottery?
Obviously I wouldn’t recommend trying to hike Angels Landing without a permit. According to the National Park Service, rangers may ask to see permits at any point along the trail at any time of day or night.
You can hike all the way up to Scout Lookout without a permit, but if you get caught hiking the chain section without a permit, the punishment could be a fine of up to $5,000 USD and/or six months in jail. It’s not worth the risk.
However, you still have some options if you aren’t able to win the lottery. You can hike up to Scout Lookout and then turn back, or you can do the Observation Point hike, which has some of the best views in Zion National Park.
It’s also possible to book a guided hike of Angels Landing with a tour company. Prices are steep, but a guide and permit is included so you aren’t at the mercy of the lottery system.
Book Now: Angels Landing Guided Hike (Permits Included)
Where To Stay At Zion


Best Utah Tours
More Utah Travel Guides
Thanks for looking! I hope you enjoyed this explanation of how to do the Angels Landing trail in Zion National Park, Utah.
Don’t forget to check out my other Utah hiking guides before you go!
See Also
- Angels Landing Guided Hiking Tour Package (Permits Included)
- Best Hikes In Zion National Park
- Best Hikes In Utah: A Complete Guide
- Best Slot Canyons In Utah
- Antelope Canyon Tours In Arizona: Which Is Best? (Upper, Lower, X)
9 comments
Permits are required bc y’all keep posting about Angels Landing & ZNP. Used to be our great Utah secret. Now there’s a bunch of red tape to even get on the trail. To be fair, this is a great article. 👍 Very thorough. Just long for the old days when it wasn’t so packed that we need to obtain a permit.
Winter is actually a great time to hike Angel’s landing. The amount of people is the most dangerous thing. In winter, there are very few hikers to clutter up the chains.
Yep, winter can be good too as long as there isn’t snow or ice.
Just completed with a friend this past Wednesday. Saw plenty of fatties doing it. There are 4 key points to remember.
1. GO VERY VERY SLOW
2. SEE POINT 1
3. SEE POINT 2
4. BRING AND DRINK PLENTY OF WATER
That’s a pretty good summary.
This was an excellent post! Thank you for being brief but still informative. I’m hoping to win the lottery this year and hike it in May. Fingers crossed!
Your photos were incredible! What camera did you use on your hike? Did you get the image of the switchbacks from the top with a drone or is that a spot on the trail where you can look backwards and see the switchbacks?
Thanks! Good luck with the lottery! I used a Fuji X-T2 camera for these pics, no drone needed. You’ll see the spot when you’re near the end of the switchbacks and look back at the trail.
I hiked the Angles Landing trail twice. In 1979 and 1980. I do not remember any chain supported sections. The only place I remember chain section in a park during those years was when descending down from the heights of Mooney Falls down to the Colorado river while visiting the Havasupai reservation. Was the Angel’s landing trail tricky? Yes, it was. But quite doable if you kept your head and thus balance. The view from the terminus was, as this article mentions, spectacular. I remember it well to this day, such was the impression it made upon a 17 and 18 year old. Do it if you can, and can maintain your courage in the face of what could instill fear. I’m 64 now, but would enjoy the chance to do it again.
Thanks for sharing your experience! The trail has definitely gone through some changes since the 80s, but it’s still a blast. I hope you can do it again someday.